Quilling Tree
This page will teach you how to make a quilling tree.
Quilling Tree Instructions
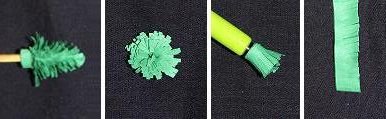
- Start with a green strip of paper that is is ⅜” wide and 8″ long. Fringe the paper in one of three ways:
- Fold the strip of paper in half crosswise. Use scissors to cut the paper repeatedly crosswise. Cut only ¾ of the way across. Unfold and you will get a paper with a frilly, fringe edge.
- You can also hold the quilling paper with a clamp. This will allow you to make cuts of equal depth without accidentally cutting through the entire strip. See photo here.
- A third alternative is to use a quilling fringer. This tool is like a stapler: you press down on it and it will cut your paper to have a fringe edge. After each press, the fringer will advance the paper automatically. See fringer here.
- Insert the end of the fringed paper into a slotted quilling tool and roll the paper into a tight coil.
- Remove the tight coil from the quilling tool and pry open the fringes. This will give you a green fringed flower.
- Insert a toothpick in the bottom of the flower. Push down gently to separate the rounds of paper. You will get a tree shape.

- start here: basic quilling instructions
- learn to make scrolls
- learn to make straight huskings
- learn to make fan-shaped huskings
- make spreuer with a quilling comb
- make evenly-space petals with a quilling comb
- make an exotic filigree leaf
- see other things you can make with strips of paper
- Like Us on Facebook


