Quilling Scrolls
Learn how to make quilling scrolls. These swirly, curly strips of paper can be used to enhance and decorate greeting cards and picture frames.
A quilling scroll is different from a quilling coil. Coils are held together with glue whereas scrolls are left loose. As a consequence, these strips of paper have a very airy feel to them. They are used in conjunction with coils. For example, a scroll can be the stem that connects the flower head and the leaves.
There are 4 or 5 basic scrolls:
Scroll Heart C-Scroll S-Scroll V-Scroll
How to Make Basic Quilling Scrolls
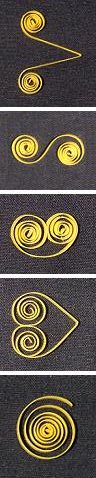
Heart and V-Scroll:
Take a strip of paper and fold it in half. Unfold it and insert the end into the slotted quilling tool.
For the heart scroll, roll the paper towards the inside of the folded crease. Remove the coil from the quilling tool and allow the rounds to relax. Repeat with the other end of the paper. Arrange the scroll so that it is in the shape of a heart. Optional: you may place a small dab of glue in between the two coils.
For the V-scroll, roll the paper towards the outside of the crease line. Repeat on the other side and arrange the coils to look symmetrical.
C-Scroll and S-Scroll:
Take a strip of paper and identify the midpoint (do not fold, just look). Roll the end of the paper towards the midpoint and then release the coil. Repeat with the other end of the paper. Arrange the coils so that they are the same size; shape the paper so it curves evenly.
For the C-scroll, roll one coil clockwise and the other counter-clockwise so that the coils come together head-to-head.
For the S-scroll, roll both coils in the same direction; they will be more like head-to-tail.
Scrolls make great borders and trims.

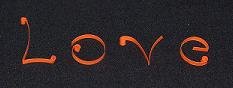
Scrolls can be used to make letters:
Fold the paper to make a variety of shapes:
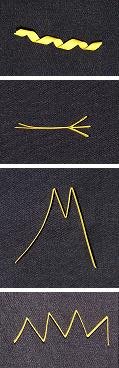
zig-zag bird beaks bird feet spiral


