Origamic Architecture
Origamic architecture (OA) and pop-up cards are a type of kirigami. When compared to paper snowflakes, these paper art forms are like the “extreme sports” of kirigami.
Kirigami Cut-Outs
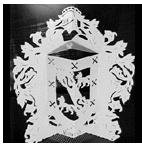
Most people will remember kirigami as the paper snowflakes made by school-aged children. However, you can cut paper to form masks, animal silhouettes, logos, and coat-of-arms. If you have the patience and tools, the possibilities are endless. [Photo by Marivi]
Origamic Architecture and Pop-Up Cards
OA was developed by Masahiro Chatani in the 1980’s (read bio). He and Keiko Nakazawa
have published many books on how to make these amazing creations. Together these two artists have introduced and inspired many others to excel in this art form.
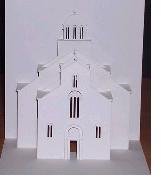
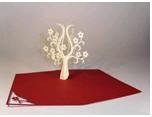
Most origamic architecture designs are viewed when the paper is open half way (90° angle). This type of OA requires cutting and folding. An example of this would be a pop-up card. You can also design models which are viewed when the paper is opened completely (180° angle). This requires cutting, folding and gluing. This is seen in some pop-up books. Less common are the designs which are viewed when the paper is opened 360°.
[Photo by Jagoda]
Other Paper Arts
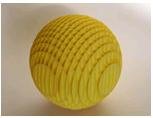 There are many artists who create dazzling designs by cutting paper. These can be flat cut-outs, pop-ups, or 3 dimensionals (as in globes and spheres). [Photo by T & C Taviori].
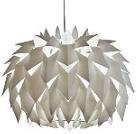
Check out this lampshade made by Peter Ayres. It was made by cutting one piece of paper in a repeating pattern. [Photo by P Ayres].
As one might expect, artists who can do one form of paper cutting can usually do the other forms. It is just a matter of preference as to what they choose to create. Indeed, one can argue that there is no difference between origamic architecture, pop-ups and other paper-cuts.
Easy Pop-Up Projects
There are a few easy pop-up projects that children can make. You will need scissors; a sheet of white paper; and a colored sheet for backing. We recommend that an adult help with the projects. The projects themselves are easy but the problem lies in the topology. The conversion of a flat piece of paper into one with dimensionality can be challenging for some children: in other words “how do you get this thing to pop up?!”
Tools for Making OA
True, hard core origamic architecture takes a lot of patience and skill. It’s really not for children. For those who wish to enter the world of OA, there are some essential tools. Please note: children should not be allowed to use an X-acto knife. These knives are very sharp and can do much harm even to adults. [Photo by T & C Taviori]
- pencil, eraser, removable tape
- an X-acto (craft) knife (see X-acto knives
here)
- a metal ruler or a ruler with a metal edge (see metal rulers
- a self-healing mat (see self healing mats
- paper or cardstock (see card stock
- a creasing tool like a folding bone (read about folding bone here or purchase bone folder
- The above equipment is not necessary if you have access to a laser cutter
How to Make 90° Origamic Architecture Card
First you need to get a pattern or a design. You can get a pattern from a book, from the internet, or design one yourself. This web site provides mini lessons on how to start designing your own OA patterns.
- learn to design easy OA here
- patterns from an Origamic Architecture book
- patterns from the internet
- Evermon and O-Deer from evermore.com
- Coat of Arms tutorials from Marivi’s Heraldry
- buildings in Asian & Europe, holiday patterns from Willem’s Origamic Architecture.
- More free patterns from origami-art.us
- Transfer the design onto your paper or cardstock. If it is from the internet, you can print it out. If it is in a book, you can hand copy (or photocopy) it to your card stock.
- Tape the card stock onto the self-healing mat.
- Use a ruler and an X-acto knife to carefully cut the paper on the lines indicated.
- Remove the paper from the mat. Examine the instructions carefully. Use your creasing tool to fold the paper in regions designated as mountain or valley folds.
- Slowly close the paper or cardstock making sure that the folds are in the proper orientation. When you open the card again, the design will pop out.
- If you used a pencil to transfer the pattern, erase the pencil marks from your cardstock. Some people photocopy or draw the pattern on a separate thin sheet of paper and layer this ontop of the cardstock. When you cut, cut through both layers. When done, discard the top sheet with the pattern.
- Glue this paper onto another sheet as a backing (optional).
Great Galleries
These web sites have beautiful OA and paper artwork.


