Quilling Combing Petals

Quilling Combing Petals
This page show you how to make evenly-spaced petal-shapes using the technique of combing. In combing, you use an onion holder, also called a “quilling comb”.
Quilling Combing Petals
An onion holder looks like a hair pick – the kind used by people with Afro hairstyles. In the technique of combing, you can use a regular comb, a pick comb, or an onion holder – they all work equally well.
In the kitchen, an onion holder is used to hold an onion as you cut it. The metal tines (prongs) dig into the onion layers and allows you to chop the onion without endangering your fingers.
In quilling, a strip of paper is wrapped around the tines of the onion holder. There are at least 3 ways to use an onion holder:
      – make evenly shaped petals
      – make flat, leaf-like shapes
      – make exotic, filigree leaves

Let’s start by making quilling combing petals for flower…


Making Evenly Spaced Quilling Combing Petals with aa Onion Holder

Like husking, this method allows you to reproduce shapes without the uncertainty of basic quilling techniques. The distance between the tines are the same, so the resulting shapes look almost identical every time.

The limitation to this technique is that the distance between the loops are defined by the distance of tines in the comb. You cannot make smaller petals with more loops in the petal. To achieve that, you would have to get combs with different density of tines. A typical quilling comb has 15 metal tines.

    quilling petals

  1. Start by getting an onion holder or a comb and a strip of paper. The paper used here was 1/8″ wide but you can use wider strips. Fold the tail end of the paper so it forms a hook.
  2. Hook the paper onto the bottom tine so the hook is in front and the paper is behind the comb.
  3.  
    quilling petals

  4. Weave the long end of the paper to the front of the comb. The paper should weave at the location one-tine up (between tine 2 and 3). Add a drop of glue on the hook.
  5. Pull the long end of the paper down towards the hook. Press the two layers together and hold for a few seconds so the glue can set.
  6. Bring the long end of the paper up behind the comb. Weave the paper to the front between the tine that is just one-up (between tines 3 and 4).
  7. Place a dab of glue near the base of the paper where the hook would have been. Pull the long end of the paper down towards the base. Press down for a few seconds so the layers glue together.
  8.  
    quilling petals

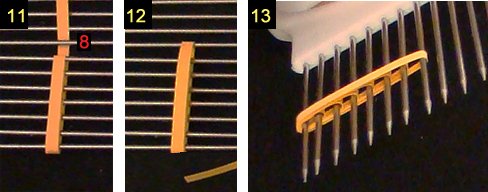
  9. Repeat this looping process up towards the 4th,
  10. 5th,
  11. 6th,
  12. and 7th tines until you achieve the length you desire.
  13.  
    quilling petals

  14. In this example, the 8th tine is the last tine used.
  15. To finish off, bring the paper down, cut off the excess paper, and glue down the loose end.
  16. This is how the paper looks like on the comb. Carefully ease the looped paper off the tines of the comb.
  17.  
    quilling petals

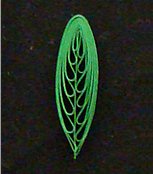
  18. Initially, the shape will be exactly as defined by the location of the tines.
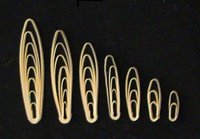
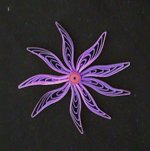
  19. You can change the shape of the paper by holding one end and pressing down the other end. This widens the shape.
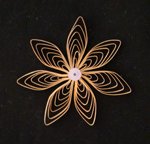
  20. You can then mold it by running the shape between your fingers. Make 5 to 10 of these petals and arrange them into a flower.
Shown on the right are petals made with an onion holder. The largest one used 9 tines. Note how evenly spaced the layers of paper are. It would be difficult to get this level of uniformity with basic techniques. Shown on the left is an exotic filigree leaf.
quilling combing
  •  
     

    Please Help

    Please help by reporting broken links so that we can fix them. One easy message from you can save us hours and hours of clicking. Thanks!

  •  

    More Origami Diagrams and Instructions…

  • These free origami instructions are made available to you by the paper folding community at large. If you have a diagram you would like to share, or if your diagram is listed here and you wish to have it removed, please Contact Us. Diagrams are intended for personal use. Copyright of the models lie with the origami creators and designers. Please contact the designer and/or creator directly for non-private usage of a model and/or artwork.