Quilling Scrolls

These step-by-step quilling instructions will allow you to make these basic shapes:


Tight Coil   •    Loose Coil   •   Eccentric Coil   •   Teardrop      •    Eye

quilling basic shapes
Half Moon   •   Crescent   •   Triangle   •     Square     •       Beehive


Gather the following items:
– strips of paper (⅛ or ¼ inches wide) of varying colors
– a slotted quilling tool,
– a drop of white glue on a piece of scrap paper and
– a toothpick.

Quilling Instructions : How to Make a Tight Coil

  1. Insert the end of the paper into the slot of the quilling tool.
  2. Turn the slotted tool towards you. Place your thumb or index finger at the very tip of the slotted tool: this will prevent the paper from slipping off the tool. Use the other fingers to guide the strip of paper so that it rolls into an even plug (called a tight coil).
  3. When done, turn the slotted tool a quarter turn away from you. Pull the plug out of the slotted tool. Hint: the coil comes off the tool neatly if you pull the coil off the tool and not pull the tool out of the coil.
  4. Use a toothpick to apply a small smidgen of glue onto the free end of the tight coil. Use your finger, a clean toothpick, or forceps to press the free end onto the coil.
  5. When dry (about 5 seconds), you will have a tight coil. These can be used to make flowers, grapes, eyes and more.
quilling how to instructions

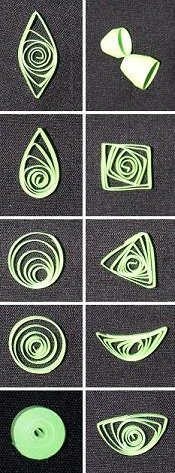
How to Make Loose Coils and Basic Shapes

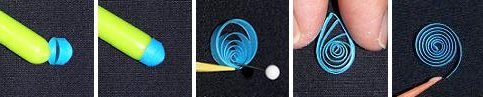
Loose Coil: To make a loose coil, simply roll a strip of paper as above. Once you have removed the coil from the slotted quilling tool, immediately release the coil so that it can unravel. The tight coil will relax into a loose coil. If your coil remains tightly wound, you need to work faster and release the coil before the curves have set. After the coil has relaxed, apply glue and secure the loose end as above.
 

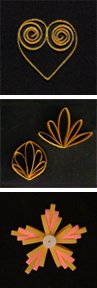
Teardrop: To make the basic shapes, pinch the loose coil at the proper location. Don’t be afraid to pinch your loose coil – teardrops and eyes are very easy to make. Squares and triangles require a little more practice to ensure equal distances between the corners. Loose coils can be pinched into other shapes such as holly, hexagon, duck feet, and so forth.
 

Eccentric Loose Coil: Make a loose coil as above. Use a clean toothpick or a pin to compress the rounds of paper towards one side of the coil. Apply glue all along the top of the coil where the rounds meet. Hold the shape for 10 seconds before releasing. Making an eccentric coil is easier if you have a circle template, a cork board, or forceps. Read about tools here).
 

Beehive: Make a tight coil as above. Use the back-end of the slotted quilling tool to push the layers of paper away from one another. You can also use other implements such as the eraser-end of a pencil, or a round-ended ball-point pen.


quilling loose coils beehives

Scrolls: Make a loose coil and leave it open-ended. this method is great for making letters of the alphabet or decorative borders. Learn to make them here.
 

Husking: uses pins to generate uniform loops and shapes. There are two methods: Straight Husking and Fan Shaped Husking. Learn to make them here.
 

Combing: uses a comb or an onion holder to makes scalloped shapes. Great for wings, pinwheels, borders, and other filled shapes. It’s a totally new look. Combing quilling instructions here.

quilling husking
  •  
     

    Please Help

    Please help by reporting broken links so that we can fix them. One easy message from you can save us hours and hours of clicking. Thanks!

  •  

    More Origami Diagrams and Instructions…

  • These free origami instructions are made available to you by the paper folding community at large. If you have a diagram you would like to share, or if your diagram is listed here and you wish to have it removed, please Contact Us. Diagrams are intended for personal use. Copyright of the models lie with the origami creators and designers. Please contact the designer and/or creator directly for non-private usage of a model and/or artwork.