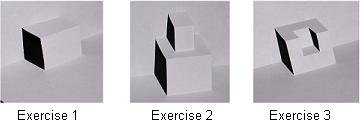
Designing Origamic Architecture: Exercise 1
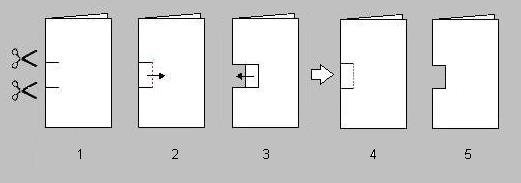
To begin, let’s try an easy pop-up card that you can make with scissors. Fold a piece of paper in half and cut two notches (step 1). Valley fold and then unfold the flap of paper (step 2 & 3). Open the paper and push the flap inwards so that it lies in between the folded sheet (step 4). Make sure that the flap folds along the crease made in step 2.

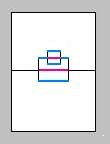
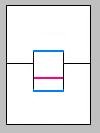
There you go, your first pop-up box! An OA expert would draw the pattern as shown on the right.
The black line across the middle of the sheet represents the fold line: this is where the paper is folded in half to make the card.
The vertical black lines represent the places where you cut.
The blue line represent valley folds.
The red line represent mountain folds.
Other artists may use slightly different notation, but the idea will be similar.
Designing Origamic Architecture: Exercise 2

Let’s add another box on top of the box pop-up made above. To do this, cut two notches on the edge labeled A. Only cut the top folded sheet (if you cut all 2 layers, you will get three boxes). Repeat the folding sequence as in exercise 1. The result is a box on top of box.
The upper box will always be a little smaller than the bottom box. You can repeat this process to get stacks of boxes. The pattern (or diagram) is shown below.
Examine it carefully and confirm that the valley folds and mountain folds are as described. Be sure to understand the pattern because in the next exercises, we will no longer show the detailed instructions. All information will be compressed in one image: the pattern. Watch a video demonstrating a similar project.
Designing Origamic Architecture: Exercise 3

Let’s try the same thing again but with the inner edge labeled B. Make an easy pop up box as in exercise 1. Open the card slightly, jam scissors between the sheets and cut two notches in the inner folded edge B. Valley fold and unfold this new flap. Push the small flap towards the back of the card.
Now it looks like a chair with wide armrests. The pattern is shown on the right. If you repeat the exercise using the edge labeled C, you will get a small box in front of the original big box. This is the same as the result of exercise 2 flipped over.

Designing Origamic Architecture: Exercise 4
There are other variations you can try, but let’s move away from the boxy pop-up. Imagine that you want a box that is flat like a shirt-gift box. Namely, it is short and deep.

To make the box short, the cut above the fold line (A) should be short. And, to make the box deep, the cut below the fold line (B) should be long. Because the lengths of the cuts above and below the fold line are not the same, you can’t use scissors anymore. Time to move on to the X-acto knife.
Make the cuts with an X-acto knife and push the flap so that it lies in between the folded paper. You will need to make valley folds at the blue lines. In order for the pop-up to look like a gift-box, the height at the front of the box (H) must be the same as the height of the cut above the fold line (A). Since you can measure A, you can determine the exact location of the mountain fold (red line).
An OA expert would proceed this way:
– draw the lines where cuts and folds will occur,
– make the cuts,
– make the necessary folds one by one, and then
– collapse the pop-up into its final shape.
Turn this pop-up upside down. Now you have a building found in many OA designs. Make a dome roof, cut out windows and doors: congratulations, you’ve made your first building!

Designing Origamic Architecture: Exercise 5
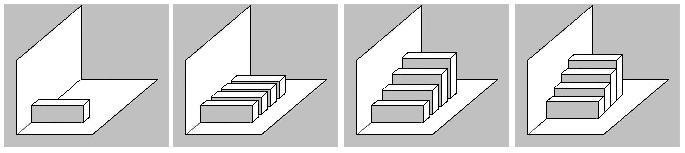
Consider the shirt gift-box above. Let’s make this box skinny so we have room to add other elements in the pop-up. Let’s make a few more boxes beside it. Let’s make it exciting my making the other boxes bigger and bigger. Better yet, let’s push the boxes side by side. Now it looks like a staircase.
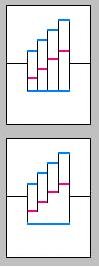
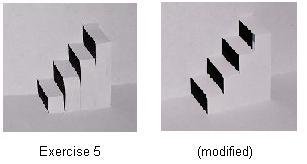
The pattern for the staircase is show on the right. Copy this onto your paper, make the cuts using an X-acto knife. Use a creasing tool to help you make all the valley and mountain folds. Collapse the model and you have a staircase!
Careful examination of the staircase will show that you didn’t need to cut each step all the way down to the base of the paper. You can modify your pattern and make a more sturdy staircase.
We hope that you’ve enjoy designing origamic architecture with us. You’re ready to strike out on your own with more designs or try the OA patterns available on the internet. Many artists use existing buildings as a model for their OA: see samples here. Perhaps you could do the same with noteworthy buildings in your part of the world.


