Money Gift Box

by Clay Randall

dollar bill gift box

This Money Gift Box is by Clay Randall and used to be found on this web site: http://members.cox.net/crandall11/money/box/
But this site is no longer active and we have captured the image and reproduce it here. Please contact us if you are the rightful owner of this diagram and wish for it to be removed. Otherwise, thank you for sharing your talent.

Gift Box

This box made from two bills. The bills/box can be the gift itself, but it is also just about the right size for a ring box. (Perhaps a dollar-bill ring?)

Get yourself two fairly new, crisp bills. Older "soggier" bills are much harder to work with. For this design to work, the folds should be very precise, and perpendicular to the edges of the bill if the resulting is to be rectangular.


dollar bill gift box

Lay the bill on a flat surface, face up. Fold the bill in thirds lengthwise as shown. Gently unfold these folds, you will reuse them later. I will refer to these as the third folds.


dollar bill gift box

dollar bill gift box

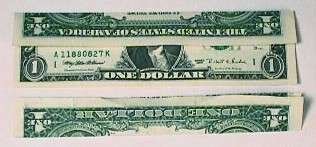
Fold the note top-to-bottom just to the right of the portrait, then unfold. Repeat just to the left of the portrait. I will refer to these as the portrait folds. Note that the third folds the oppose (are perpendicular to) the portrait folds.


dollar bill gift box

Starting at the top left corner (as illustrated), close the top third fold to about 90 degrees. Lift the right edge of the bill to the right of the right portrait fold up while holding the top third fold in place, allowing the third fold to close completely to the right of this corner.


dollar bill gift box

Inside this corner will be a remaining portion that you will crease
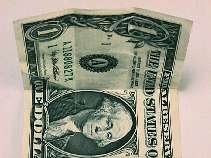
along the natural 45 degree line to complete the corner.


dollar bill gift box

Complete the previous step for the other three corners. Now you will
have two "tabs" sticking up on the left and right sides.


dollar bill gift box

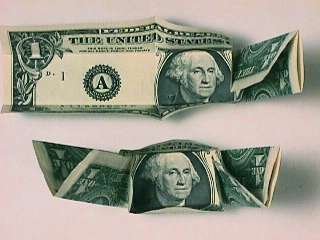
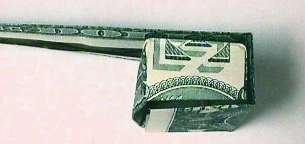
For each tab, pull it inside the box, folding so that the natural
edge of the box is pulled slightly over inside the fold.
(Look carefully at the bottom left of the picture.)

Do this evenly for both tabs.

For the two other sides, evenly fold over the edge of the bill.

You should now have an open box


If you make another piece just like the first, but slightly larger, you would have a lid similar to that found on most shoe boxes. To adjust the instructions above, you would fold so that the inner rectangle (bounded by the third and portrait folds) is slightly larger.

I do not like the way that looks, so I close the box another way as illustrated below. Try both – choose whichever you prefer.


dollar bill gift box
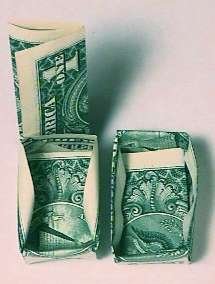
Fold the second bill lengthwise so that the width matches the widest portion of the open box you just made. I will refer to this bill as the cover, and the previous piece made as the open box in the following steps.

You need two folds as shown to be able to follow the last step (see below). For general appearance, it is nice if these are nearly symmetrical as shown. These will be called the width folds.


dollar bill gift box

Holding one end of the cover across the bottom of the open box, find the point which matches the corner of the open box and fold at that point.

After folding, open the fold to 90 degrees, hold the cover back in place, and find the point for the next corner of the open box as the cover wraps around.

dollar bill gift box

Repeat this process until the cover wraps over itself (four folds).

These will be called the wrapping folds.


dollar bill gift box

There is now one very long side to the cover. Fold back the long side so that is just a bit shorter than the first side.

I will call this the end cover fold.

In this illustration, the end cover fold is at the left edge of the picture. I have also (gently) completely unfolded the cover, refolded the end cover fold, the width folds, then the wrapping folds in that order. (This unfolding/refolding is optional, but makes the cover look nicer.)

In either case, the end cover fold puts the remainder of the long side inside the wrapping folds. Refold the wrapping folds holding the long side in place to crease it at the correct points.


dollar bill gift box

Open up the width folds slightly on the open end, and insert the last side under the width folds. (Normally I do this with the open box already inside, but for clarity, the picture shows this without the open box.


dollar bill gift box

Slide the open box inside the cover before closing the cover tightly, or close the cover with the open box already inside. In either case you are done.
dollar bill gift box

Of course if the gift box is for something special, a little ribbon adds a nice touch. (I used ordinary curling ribbon, cut in thirds lengthwise for this picture.
  •  

    Dollar Bill Origami Diagrams

    Intro to $

    A to G

    H to Z

    Animals

    Plants

    Heart, Star

    Clothing

    Graduation

    Other

    Videos


  •  

    Books with Dollar Bill Origami

    • The Buck Book by Anne A Johnson (book review)
    • The Guide to Hawaiian Style Money Folds by Jodi Fukumoto (book review)
    • The Guide to American Money Folds by Jodi Fukumoto (book review)
    • Dollar Bill Origami by John Montroll (book review)
    • Dollar Bill Animals in Origami by John Montroll
    • Origami with Dollar Bills: Another Way to Impress People with Your Money! by Duy Nguyen
    • Money Folding (Origami Favorites Series) by Florence Temko


    Buy Dollar Bill Origami Books

  •  
     

    Please Help

    Please help by reporting broken links so that we can fix them. One easy message from you can save us hours and hours of clicking. Thanks!

  •  

    More Origami Diagrams and Instructions…

  • These free origami instructions are made available to you by the paper folding community at large. If you have a diagram you would like to share, or if your diagram is listed here and you wish to have it removed, please Contact Us. Diagrams are intended for personal use. Copyright of the models lie with the origami creators and designers. Please contact the designer and/or creator directly for non-private usage of a model and/or artwork.