Lucky Star Bracelet Instructions
- Measure the size of your wrist with a flexible tape measure. Or, wrap a string around your wrist and then measure the length of the string. Once you have determined the size of your wrists, add one inch to that length. For example, if your wrists measure 6″, then expect to make a bracelet 7″ long. This will produce a bracelet that rotates and moves freely. If you wish to have a snug bracelet then increase length by ¾” instead of 1″.
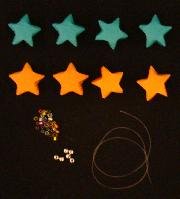
- Fold six to eight lucky stars using paper that is ½” x 11″. Learn how to make them here or here. Use a pin to poke a hole clear across the lucky stars; remove pin.
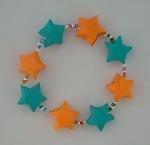
- Arrange the lucky stars in a row. For the alternating orange-blue-orange-blue pattern shown, you will need an even number of lucky stars (typically 6 or 8 stars). If you use another color combination (for example, a rainbow of colors), then you can use as many lucky stars as you wish. Add more/less beads in between the lucky stars to achieve the desired bracelet length.

Thread the stretchy cord into the eye of a needle and then thread a lucky star onto the stretchy cord.

Thread on beads and then another lucky star. Continue until all the lucky stars and beads have been threaded onto the stretchy cord.
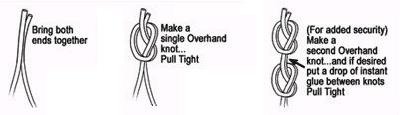
Grasp the two ends of the stretchy cord together and tie a standard overhand knot. Push the knot as close to the lucky star as possible. Tip: tie the overhand knot loosely over the shaft of a needle and use the needle to scooch the knot close to the lucky star before you cinch the knot tight.
- One knot is sufficient, but you can make a second overhand knot to be extra secure. You can also overlay the knot with a small dot of glue. You’re done making a lucky star bracelet!
Lucky stars are very sturdy and glue is not needed to keep the model together. If you wish, you may coat the lucky stars before threading them onto the stretchy cord. Read about sealants here.