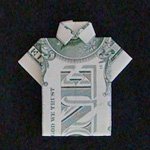
Butterfly
by Clay Randall
This dollar bill butterfly is by Clay Randall and used to be found on this web site: http://members.cox.net/crandall11/money/butterfly/
But this site is no longer active and we have captured the image and reproduce it here. Please contact us if you are the rightful owner of this diagram and wish for it to be removed. Otherwise, thank you for sharing your talent.
The first few steps will involve folding the bill, and then unfolding it.
These steps are to get creases in the bill. All of these folds will be
reused, except one. When unfolding after the initial fold, do not attempt
to flatten the bill again, just open it up enough to be able to perform the
next step.
Of course in all the following diagrams, the old folds are flattened, but
that is because I made the images on a flatbed scanner.

Fold the bill precisely in half top-to-bottom, then unfold. Fold
the bill precisely in half left-to-right, then unfold.

Fold the bill precisely from corner-to-corner diagonally, then unfold.
Repeat this fold for the other two diagonal corners.

Fold both ends as shown. This odd angle fold is from the upper corner of the
bill to about 1/2 inch inside the lower corner on each side. Try to make the
folds symetrical. These folds will remain – do not unfold.

Following the diagonal creases created two steps above, refold and re-unfold
along each diagonal. (This is to crease the end folds created in the previous
step.)
While the diagonal is held folded, fold and unfold along the “half
top-to-bottom” the two corners that have the end points of the diagonal
fold. (This is difficult to describe in writing – look at the picture!)
After these two creases are complete, open the diagonal fold and repeat this
step for the other diagonal fold. An attempt to make this clearer:
Okay, the problem here is that I don’t have access to a scanner or
digital camera at the moment. So I’m trying do this from a picture
that I already have. The two pictures below are the same as the 1st
and 4th pictures from the regular instructions.
Okay, the top bill in this image shows the “half-top-to-bottom” fold.
In this picture, the top edge of the front face of the bill is in the middle/right of the picture. It is (approximately) horizontal.
The half-top-to-bottom fold is also horizontal in this picture, but is (mostly) obscured by two other folds.
Using the half-top-to-bottom’s crease, fold the bottom right corner (as seen in this picture).
This will cause the lower half of the diagonal fold shown at the bottom of this picture to approximately meet the other diagonal on the right side.
Imagine that the following text is a stylized diagram of the previous picture:
              . \
          .       \
       .            \-------------------.
           .          \                /
               .        \             /
                   .      \          /
fold line ----->       .    \       /    <----- fold line
                           .  \    /
                              . \ /
                                 .
If you get that one fold, it should now look like this:
       . \
   .       \
.            \-------------------.
    .          \         .\     /
        .        \   .     \   /
            .    .          \ /
              ---------------       <---   Fold was here
(Okay, it’s really hard to draw diagonals in ASCII.)
Anyway, I know that’s not necessarily a whole lot clearer, but without the ability to take more pictures at the moment, that’s about the best
I can do…

Believe it or not, this picture shows the next fold (singular). Using all
the folds/creases created before, simply bring the left & right ends
together while "encouraging" the half left-to-right, both diagonals,
and the folds made in the previous step to re-fold. If you’re doing it right,
it will start to look like the picture, but won’t quite close. Holding the
half left-to-right and both diagonal fold creases closed, gently force the
center section of the bill to close. This will create four new folds
(automatically in the correct place if you don’t let anything poke out the
wrong place). If anything extra is sticking out, don’t close this fold.
Re-open slightly, tuck it back in, and try closing again. (This is quite
difficult to describe, but is not hard to do!)

Along the line between where the top/bottom edges intersect the diagonal
folds, make a new fold. (Look at the picture.) This will be the narrowest
point along the "wing". Do this on both sides of the center,
keeping the folds symetrical with each other.
Unfold one of the folds made in the previous step. Parallel to the crease from
this fold, fold the "remainder" of the center in half. Do it again.
(These folds are tough to get tight since there are so many layers of paper
here.) This center portion ends up as a long, skinny "body" for the
butterfly.

Open both wings along their folds. The body should look like the image on
the left (on one side). Notice that portion of the body along the center
folds are slightly larger than along the edges of the bill. Fold the larger
portion tightly over the edges. Then twist a small amount of the end over in
the same direction. (This is what keeps the body portion from unfolding
itself.) It isn’t too critical how you do this as long as the body stays
folded. (Sorry, this doesn’t show up too well on the flatbed.)
Fold the wings down again. You’re basically done. You can "pinch"
the tips of the wings to get a slight rise and more pointed look. (No way to
show on a flatbed – fake it.)
-
Dollar Bill Origami Diagrams
Intro to $
A to G

H to Z

Animals

Plants

Heart, Star

Clothing

Graduation

Other

Videos