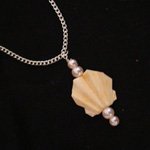
Origami Shell Necklace

Learn to make this classy, origami shell necklace. You will need (buy supplies here):
- one 2″ head pin,
- three 4 mm jump rings,
- four pearl beads,
- a clasp,
- a 17″ length of chain.
- one origami shell,
- glue,
- a clear, waterproof coating,
- a pin or needle,
- round nose pliers, and
- wire cutter.

Origami Shell Necklace Instructions
- Take a square sheet of paper (1.75″ x 1.75″) and fold it into an origami shell following these instructions.
- Use a sharp needle or pin to poke a hole at the base of the shell. Be sure to puncture through all layers cleanly.
- Similarly, poke a hole at the top of the shell: try to keep the holes parallel to the length of the shell.

- Thread two pearl beads onto a head pin, then thread the paper shell onto the head pin.
- To help the shell maintain its shape, apply glue between all layers of paper (read about glues here).Start by applying glue in between the two layers of paper which constitute the shell itself.
Turn the shell over and apply glue to all visible flaps and layers as shown. Allow glue to dry before proceeding.
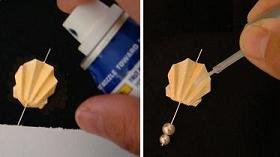
- To protect the origami shell from water, sweat, and natural oils, apply a clear waterproof coating. You can brush on a layer of clear nail polish or spray on a layer of varnish or shellac (cover the pearl beads with a sheet of paper before spraying). Read about sealants & coatings here. Allow sealant to dry before proceeding.

- Thread two more pearl beads onto the head pin. Grasp the protruding wire about an eighth of an inch above the last pearl. Bend the wire perpendicular to the length of the shell.
- Wrap the wire around the tip of the pliers to form a loop. This is easier to do if you have two pliers: one plier holds the wire at the bend while the other plier grasps the wire and does the wrapping.Wrap remaining wire around the base of the loop (below the loop but above the pearl).
- Twist open a jump ring and hook it to the loop you just made. Note: open jump rings by twisting the two sides away from one another. No not pull them apart as this will distort their shape (details here).
- Find the middle of the chain and hook the chain into the same jump ring. Close the jump ring.Attach the clasps to the two ends of the chain. A screw-on clasp was used here, but other clasps work just as well. Open a jump ring and hook it onto the last link of the chain. Hook half of the clasp onto the same jump ring and then close it. Repeat with the other half of the clasp on the other end of the chain. Done!
Note: if the origami shell necklace is too long, you can cut a few links off the chain and then re-attach the clasp. You can use a longer or shorter length of chain depending on where you want the origami shell pendant to hang. Follow these guidelines for necklaces:
- Collar Necklace (12-13 inches): are the shortest necklaces possible. They snugly wrap around the middle section of the neck .
- Choker Necklaces (14-16 inches): are the second shortest necklaces. They lie just above the collarbone near the base of the neck.
- Princess Necklaces (18-20 inches): are the most common length for necklaces. They hang below the collarbone and are visible or just-visible with a standard shirt.
- Matinee Necklaces (21-25 inches): are longer than your typical princess necklaces and rests on top of the bustline. The matinee can be worn outside of a buttoned shirt or blazer.
- Opera Necklaces (30-35 inches): are fairly long and often rests near the breastbone below the bustline. These necklaces tend to be showy with chunky gems or prominent pendants.
- Sautoir or Rope Necklace (45+ inches): very long necklaces! They can be worn super long, or can be wrapped into multiple strands of shorter necklaces. Large or heavy pendants should be avoided because they make the necklace look like it is being dragged down.
-
Books with Origami Jewelry
- Origami Jewelry: More Than 40 Exquisite Designs by Ayako Brodek | (book review)
- Origami Jewelry Motifs by Julian Laboy-Rodriguez
- Origami Jewelry by Mayumi Jezewski and Marina Orry
- LaFosse & Alexander’s Origami Jewelry by Michael G. LaFosse and Richard L. Alexander
- Origami Jewelry: A Step-by-Step Guide by Monika Cilmi
Please Help
Please help by reporting broken links so that we can fix them. One easy message from you can save us hours and hours of clicking. Thanks!
-
More Origami Diagrams and Instructions…
 Animals
 Birds
Birds Boxes
Boxes Butterflies
 Dinosaurs
 Holiday
 Dollar Bill
 Easy Origami
 Fish & Sea Life
 Flowers
 Hearts
 Insects
 Modular
 Paper Airplane
 Paper Cranes
 Polyhedra
 Reptile
 Star Wars
 Stars
Stars Vehicles
-
These free origami instructions are made available to you by the paper folding community at large. If you have a diagram you would like to share, or if your diagram is listed here and you wish to have it removed, please Contact Us. Diagrams are intended for personal use. Copyright of the models lie with the origami creators and designers. Please contact the designer and/or creator directly for non-private usage of a model and/or artwork.