

Origami Leaf Bracelet Instructions

- Choose a variety of deep, richly colored paper. Cut square sheets of paper 1.5″ x 1.5″ in size. Cut these on the diagonal into triangles. Use the triangular sheets to fold seven origami leaves according to instructions.
Use a sharp pin or needle to poke a hole through the center of the leaf where it bends.
- Remove the pin and insert an eye pin in the hole. Be sure the eye pin is pushed towards the bend as far as possible.
- Apply glue along the inner edge of the leaf (read about glues here). Press under a weight until the glue is dry.
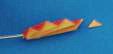 Optional: cut the tip of the origami leaf off. This extra bit of paper neither hinders nor helps the creation of the bracelet.
- Flare open the pleats of the origami leaf to the desired width. Protect the leaf from water, sweat, and natural oils, by applying a clear, waterproof coating. You can brush on a layer of clear nail polish or spray on a layer of varnish or shellac. Read about sealants & coatings here. Allow sealant to dry before proceeding.

Thread a spacer bead onto the eye pin above the origami leaf.
- Grasp the protruding wire about an eighth of an inch above the spacer bead and bend the wire perpendicular to the length of the leaf.
- Wrap the wire around the tip of the pliers to form a loop. This is easier to do if you have two pliers: one plier holds the wire at the bend while the other plier grasps the wire and does the wrapping. Wrap remaining wire around the base of the loop (below the loop but above the bead). Cut off excess wire with wire cutters.
- Twist open two jump rings and hook them to the loop you just made. The jump ring closest to the leaf will allow the leaf to dangle. The second jump ring will connect to the leather cord. Note: open jump rings by twisting the two sides away from one another. No not pull them apart as this will distort their shape (details here).
Prepare the leather cord.
Measure the size of your wrist with a flexible tape measure. Or, wrap a string around your wrist and then measure the length of the string. Once you have determined the size of your wrists, add by ¾” inch to that length. For example, if your wrists measure 6″, then expect to make a leaf bracelet 6¾” long. This will produce a bracelet that allows the leaf charms to dangle freely.
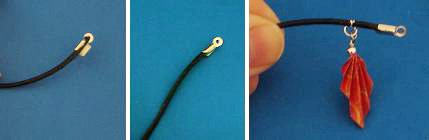
Cut a piece of leather cord of the appropriate length and attach an end cap. To do this: place the cord in the cavity of the end cap and apply a generous amount of glue. Use (crimp) pliers to fold the flaps of the end cap over the leather cord. Pinch close firmly.
- Thread the origami leaf from the other end of the leather cord. Position the charm about half an inch from the end cap. Use pliers to close the jump ring. Cinch the jump ring tightly so the charm does not slide side-to-side.

Repeat with the remaining origami leaf charms. Position the leaves approximately one inch from one another.
- Finish the leaf bracelet by adding another end cap and a clasp: Open a jump ring and hook it onto one end cap.Open a jump ring and hook it onto one end cap. Hook a lobster claw clasp onto the same jump ring and then close the jump ring. On the other end of the leaf bracelet, open a jump ring and hook it onto the end cap directly.
A lobster claw clasp was used here, but other clasps work just as well. If you find clasps difficult to manage, then try using a magnetic clasp.


