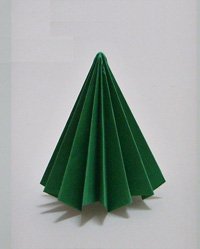
This 16-Sided Tree is an extension of the 8-Sided Tree. The model is just as easy to fold as its predecessor; you only need to perform the squash folds a few more times to achieve twice as many flaps or ridges.

This model starts with a Preliminary Base. The four flaps are squashed to form 8 smaller flaps. Each of the smaller flaps are then squashed one more time to form a total of 16 flaps. Although it is not much more work than the 8-sided tree, this tree is more delicate and appear more refined.
You can continue to squash the 16 flaps into 32 flaps however, the appearance of the 32-sideed tree is not that much different than that of the 16 Sided Tree
Bottom image: 16-Sided Tree topped with a Lucky Star.

Start with a Preliminary Base. Make the valley and mountain folds as shown and then collapse the paper into a square shape which has a total of 4 flaps (2 flaps on each side).
16-Sided Tree Diagram

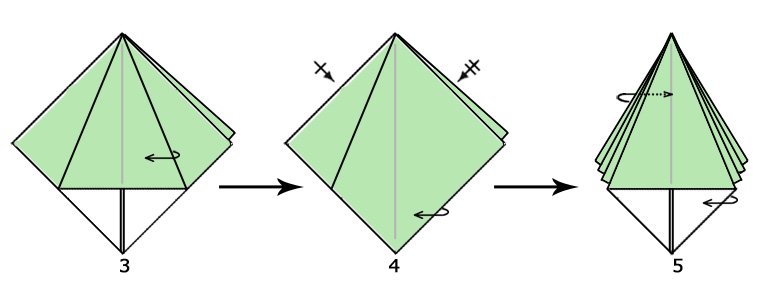
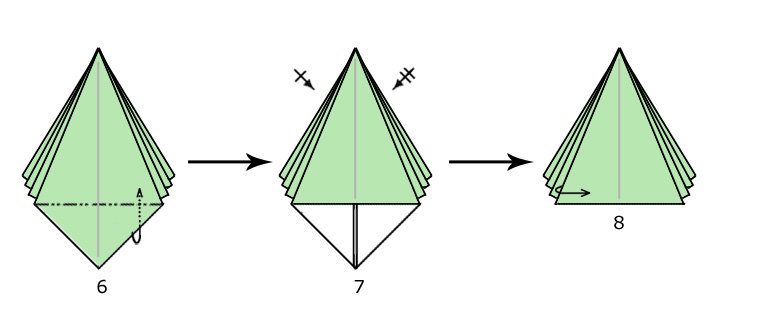


Description:
- Start with a Preliminary Base. Lift one of the flaps up towards you.
- Make a squash fold. To do this, press the flap evenly so it is flattened into a triangle with some white showing.
- Notice how the one flap is now made into two smaller flaps. Like turning pages of a book, swivel one of the smaller flap from right to left.
- Lift the right flap and repeat the squash fold. Continue in this fashion until all 4 flaps have been squashed onto 8 smaller flaps.
- Like turning pages of a book, swivel one flap from right to left. To keep the model even (with 4 flaps per side), swivel one flap from the back-left towards the back-right.
- Mountain fold (fold behind) the lower half of the paper and tuck it under itself. This converts the model from an inverted kite shape to a triangle shape.
- Turn the “pages” of the model and repeat step 6 until the model has a flat base.
- If you are making teh 8-Sided Tree, you would stop here and simply flare open the flaps. If you are making the 16-Sided Tree then you will need to squash fold each of the 8 flaps to generate 16 flaps.
- Lift the left flap…
- and squash down evenly. Note how the flaps are becoming more narrow. Swivel one “page” to the left.
- Repeat step 9: lift the right flap…
- and squash down.
- Continue in this fashion six more times.
- You will get a narrow model. Flare open the flaps; depending on the type of paper you used, the model may expand itself so it is more broad at the base, or it may remain a narrow tower of a tree.
Hint
One of the ways to ensure a beautiful model is to make really nice squash folds. Be sure to squash evenly so the crease line aligns with the edges of the paper that are underneath. The amount of paper to the left and right of the central crease should be the same.
If you are having trouble making even squashes, you can make a pre-fold as shown below. The crease will help guide the paper during the squash fold. Another thing that might help is if you use a narrow tool like a skewer (or a skinny pencil) and stick it towards the peak of the tree. This will help expand the tight areas so you can make a clean squash fold.

– more origami trees
– free origami instructions
– Home Page
– Site Map
Please Help
Please help by reporting broken links so that we can fix them. One easy message from you can save us hours and hours of clicking. Thanks!
-
More Origami Diagrams and Instructions…
-
These free origami instructions are made available to you by the paper folding community at large. If you have a diagram you would like to share, or if your diagram is listed here and you wish to have it removed, please Contact Us. Diagrams are intended for personal use. Copyright of the models lie with the origami creators and designers. Please contact the designer and/or creator directly for non-private usage of a model and/or artwork.


