Origami Squash Fold
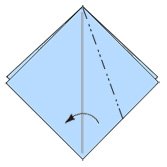
A squash fold is shown with:
a mountain fold line (dash-dot-dot; dash-dot-dot),
and one filled (black) arrow to show directionality.
There are two ways to make a squash fold.
The first method is easier but you must take care to align the top crease with the bottom layers to a tidy fold. The second method requires one extra fold, but it may be more accurate.
- Lift the flap that is to be squashed towards you.
- Pry apart the layers of paper.
- Gently press down to squash the paper creating two new mountain folds. Align the crease line on the top layer of paper with the layers of paper beneath.

The second method is to:
- Valley fold and unfold the flap which is to be squashed. This pre-creases the paper prior to squashing.
- Lift the flap that is to be squashed towards you.
- Pry apart the layers of paper. The valley fold will need to be changed into a mountain fold.
- Press down to squash the paper in place.

Another example of a squash fold:

Another example of a squash fold:


