Bubble Gum Wrapper Chain var 1

This variation of the classic bubble gum wrapper chain uses a quarter as much paper and can be done in a half as much folding. Saving paper and saving time, what could be better?

  1. Cut strips of paper of varying color. Paper used here is ½ inch wide and 4¼ inch long. Larger sizes can be used but maintain the ratio 1:8 (wide:long) plus an extra quarter inch in length to give it a little wiggle room.
  2. Fold the paper strip in half and unfold.
  3. Fold the right-edge and left-edge to the midline.
  4. Re-fold in half again using the crease made in step 1.
  5. This gives a unit that is about ½” x 1″. Make as many of these as you need for your project.

paper chain

  1. How to assemble the units: hold one unit (purple) and inserting a second unit (white) into it. Push the second unit through completely until it fits nicely as shown in step 6a.
  2. Continue to insert more units. Orient the units so you get a zig-zag pattern of alternating colors.

As in the case of the original gum wrapper chain made in the 1960’s, this variation can be used to make bracelets, crowns, picture frames, purses and more.

paper chain

Make a Bubble Gum Wrapper Chain Bracelet

First make a chain and measure how long it is by wrapping it around your wrist. The bracelet does not expand or stretch, so make sure it is wide enough so your hand can go through the hole. In this example, there were 19 units. The last piece, the connecting piece, will be the 20th unit.

  1. Unfold a unit and insert it to the last unit (#19) of the chain.
  2. Wrap the chain around to form a loop. Bring units 1 and 19 close together. Insert the unfolded unit (#20) through the first unit of the chain (#). Pull through completely so it is snug.
  3. Fold the arm of unit 20 back and…
  4. insert the arms into unit 19. This allows the zig-zag pattern to be maintained.
  5. Repeat with the other arm: fold back and tuck into unit 19.
  6. Done!
paper chain

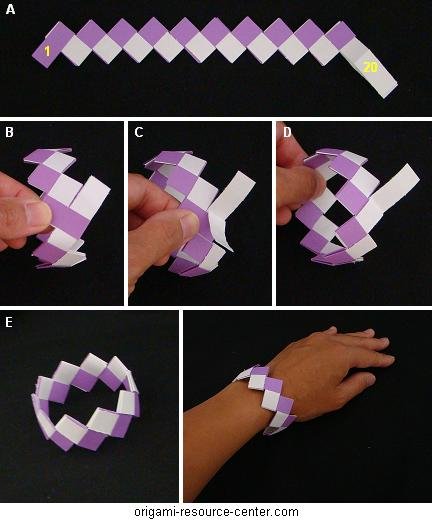
You can also make the chains (bracelet) out of dollar bills


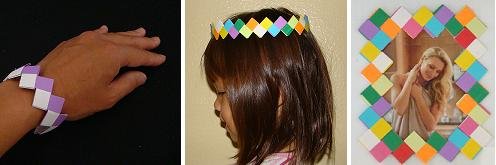
With a bit of thought and creativity, you can use these instructions to make all sorts of crafty stuff including crowns, picture frames, coasters, and more.

paper chain


  •  

    Books with Easy Origami

    • Easy Origami: over 30 simple projects by John Montroll
    • Origami Fun Kit for Beginners by John Montroll
    • My First Origami Kit by Joel Stern
    • Easy Origami: A Step-by-Step Guide for Kids by C Alexander & M Meinking
    • Fun With Easy Origami (Dover Origami Papercraft)
    • Origami: A Step-by-Step Introduction to the Art of Paper Folding by T Cook & S Henry
    • Easy Origami For Kids Book Traditional Japanese Folding Papers Overs 20 Projects by J Wish
    • Easy Origami for Kids: Over 40 Simple Origami Projects by O Brooks


    Easy Origami Books

  •  
     

    Please Help

    Please help by reporting broken links so that we can fix them. One easy message from you can save us hours and hours of clicking. Thanks!

  •  

    More Origami Diagrams and Instructions…

  • These free origami instructions are made available to you by the paper folding community at large. If you have a diagram you would like to share, or if your diagram is listed here and you wish to have it removed, please Contact Us. Diagrams are intended for personal use. Copyright of the models lie with the origami creators and designers. Please contact the designer and/or creator directly for non-private usage of a model and/or artwork.