Traditional Buttonhole Flower
This traditional Buttonhole Flower has been around for many years and it is not known who the original creator is. Contact Us if you know who created this beautiful flower; until then, we’ll refer to it as “traditional”. See diagrams below or see photo instructions here.
This traditional Buttonhole Flower looks best when the paper is the same color on both sides. If you use origami paper that is white on one side and colored on the other, be sure to start with the white side up.
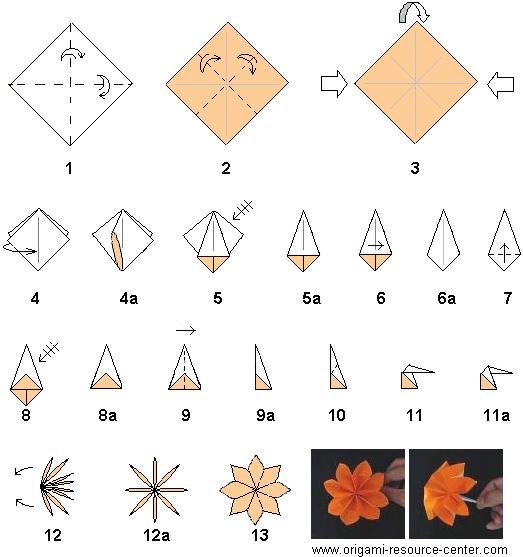
Instructions
- Position the paper so that it is like a diamond. Fold the paper left to right joining the corners, unfold. Repeat by folding top to bottom, joining corner to corner, unfold. This gives a “+” crease mark.
- Turn the paper over and fold it edge to edge, unfold. Repeat by folding edge to edge the other direction; unfold. This gives an “X” crease mark superimposed upon the “+” made in step 1.
- Collapse the paper into a preliminary base. To do this, bring the top of the paper down towards the bottom while pushing the sides inwards. This will naturally fold into diamond shape with two flaps on the left and two flaps on the right as shown in 4.
- Raise one flap towards you, pry open the layers, and squash down evenly. When done, it should look like step 5.
- Turn the model over and repeat on the backside. Like flipping pages in a book, flip one layer to the side. Repeat squash fold until all sides are done. It should look like 5a.
- Flip one flap to the side so that the model looks like an upside-down kite with no under-layers showing.
- Fold the bottom of the upside-down kite up.
- Repeat steps 6 and 7 on the backside. Flip the layers and repeat until all 4 sides have been folded up. When done, it should look like 8a.
- Fold all layers to the right so it looks like a right angle triangle. The paper gets very thick so try your best.
- Fold the top of the triangle to the right. The distance does not matter very much, but a good landmark is the place where the smaller triangle is visible (in this case, the tip of the small, orange triangle).
- Unfold the tip and reverse fold as if you were making the head of a bird.
- Hold the bird beak firmly. Rotate the model so that you are looking at it on end. Separate the 8 flaps evenly as shown 12a.To get the flaps to fan out nicely, you will need to convert a mountain fold to a valley fold. When this happens, you will feel a small “pop” and then everything falls into place.
- Use your fingers and pry open the flap layers so they look like petals. Bend back the petal a little so it keeps its shape. Finished traditional buttonhole flower.
- see traditional buttonhole flower photo instructions here
- go back to Origmai Flower page
- find more origami instructions.
-
More Origami Flowers


")


")


