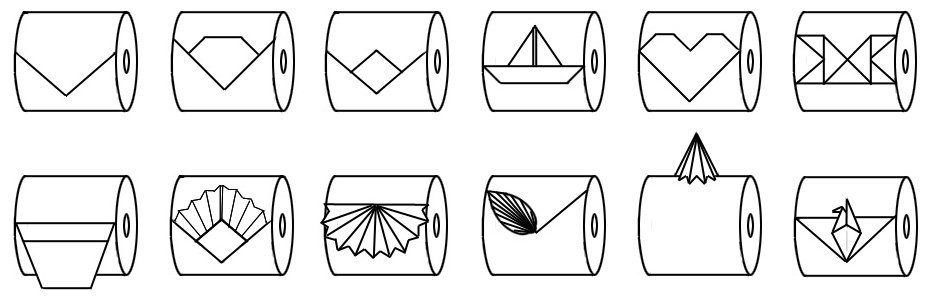
Toilet Paper Origami Triangle
![]()
Believe it or not, there are three ways to make the classic toilet paper origami triangle which you commonly see in hotels.
– the first method is the easiest,
– the second method is the least wasteful,
– and the third method is the fastest.
Toilet Paper Origami Triangle Instructions
Method 1: This method is the easiest because you use the sides of the toilet paper to align the folds.
The results are almost always perfect even with the least bit of effort.

- Pull out about 1 or 2 squares worth of TP and stretch it above the roll.
Fold the top-right corner down towards the left.
Use the edges of the toilet paper for alignment. - Valley fold the point down (join the green dots).
- Gently layer the TP back onto the roll. Adjust the roll so that the triangle hangs nicely.
- Done!
Method 2: This method is the most efficient in that it wastes the least amount of toilet paper.
It is also the most intuitive: fold down the two corners to get a point.
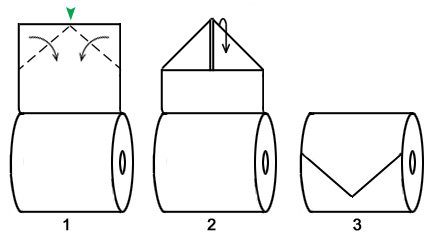
- Pull out 1 or 2 squares of TP and lift it above the roll.
Lightly fold the toilet paper in half to find the midpoint (green arrow).
Fold the top corners down allowing the triangular flaps to meet in the middle. - Gently layer the TP back onto the roll. Adjust the roll so that the triangle hangs nicely.
- Done!
Method 3: This method is the quick and dirty (poor choice of words) way of making a toilet paper triangle.
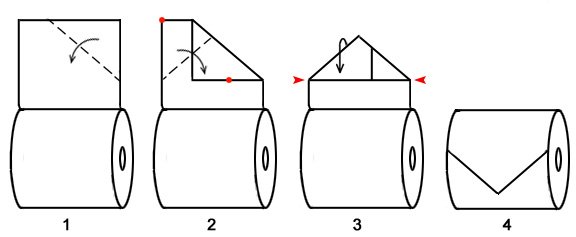
- Pull out 1 or 2 squares of TP and lift it above the roll.
Fold down the top-right corner.
The location of the fold is not important as long as it is to the left of the midpoint. - Fold the top-left corner down (join red dots) so the edges of the toilet paper are
parallel and stacked (red arrow heads). - Gently layer the TP back onto the roll. Adjust the roll so that the triangle hangs nicely.
- Done!
More Toilet Paper Origami Models