Quilling Spreuer or Combing
In basic quilling, you use a slotted quilling tool or a quilling needle.
In husking, you use round headed pins or a quilling husking board
.
In combing, you use an onion holder.

An onion holder looks like a hair pick – the kind used by people with Afro hairstyles. In the technique of combing in quilling, you can use a regular comb, a pick comb, or an onion holder – they all work equally well.
Originally, an onion holder is used to hold an onion as you cut it. The metal tines (prongs) dig into the onion layers and allows you to chop the onion without endangering your fingers.
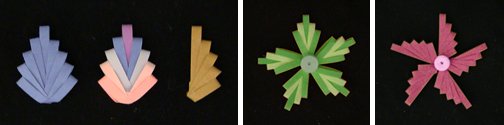
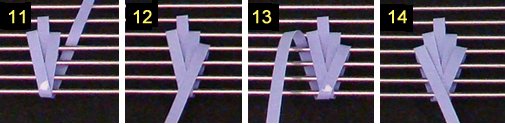
Shown from left to right are shapes you can make with combing:
– leaf-like shape (called spreuer),
– spreuer made with different color paper,
– single-sided spreuer,
– flower made with 5 spreuers,
– flower made with 5 single-sided spreuer.
In quilling, a strip of paper is wrapped around the tines of the onion holder. There are at least 3 ways to use an onion holder:
– make flat, leaf-like shapes
– make evenly shaped petals
– make exotic, filigree leaves
Let’s start with making spreuers…
Making Quilling Spreuer: flat, leaf-like Shapes


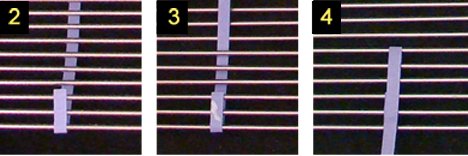
- Hook the paper onto the bottom tine so the hook is in front and the paper is behind the comb.
- Weave the long end of the paper to the front of the comb. In this example, the paper is weaved between tines 6 and 7. Add a drop of glue on the hook.
- Pull the long end of the paper down towards the hook. Press the two layers together and hold for a few seconds so the glue can set.
- Bring the long end of the paper up behind the comb. Weave the paper to the front between the tines that are just one below. In this case, the paper passes between tines 5 and 6. The paper will be offset a little.
- Place a dab of blue near the base of the paper where the hook would have been.
- Pull the long end of the paper down towards the base. Press down for a few seconds so the layers glue together.
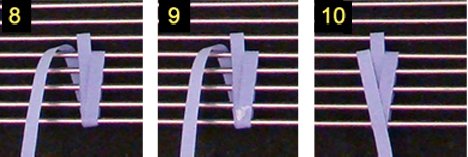
- If you are making a double sided spreuer then repeat steps 5, 6, and 7 but on the left side:
- Pull paper up behind the tool, weave it between tines 5 and 6,
- bring the paper down and press until glue is set.
- Continue in this manner: wrap the paper around the tines, alternate from right to left; move down one rung at each iteration.
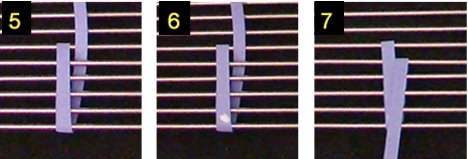
add a drop of glue at the base, then
- When done, cut off excess paper and glue down the loose end.
- Slide the completed leaf-like shape (spreuer) off the tines.


Shown are quilling spreuer (from left to right):
– leaf-like shape (spreuer),
– spreuer made with different color paper,
– single-sided spreuer,
– flower made with 5 spreuer,
– flower made with 5 single-sided spreuer.
As you might imagine, these flat shapes can be used for many things including the wings of birds and butterflies.


