Quilling Combing Leaf

quilling leaf
One exciting project you can do with the combing quilling technique is to make exotic leaves. You will need an onion holder and a strip of paper.
An onion holder looks like a hair pick – the kind used by people with Afro hairstyles. In the technique of combing, you can use a regular comb, a pick comb, or an onion holder – they all work equally well.
In the kitchen, an onion holder is used to hold an onion as you cut it. The metal tines (prongs) dig into the onion layers and allows you to chop the onion without endangering your fingers.

In quilling, a strip of paper is wrapped around the tines of the onion holder.
There are at least 3 ways to use an onion holder:
      – make exotic, filigree leaves
      – make evenly shaped petals
      – make flat, leaf-like shapes

Let’s start by making a leaf…

Making Exotic Leaves with a Onion Holder

    quilling leaf quilling leaf

  1. Weave a strip paper behind the middle tine (prong) of a quilling comb. This onion holder has 15 tines so the middle one is the 8th tine.
  2. Wrap the paper around the 9th tine and pull it down and behind the comb. Shown with red arrow.
  3. Wrap the paper around the 7th tine (one below middle-tine) and pull the paper back upwards. The paper stays behind the comb all the time.
  4. Repeat on the 10th tine: wrap the paper around the tine and pull it downwards again.
quilling leaves quilling leaves
  1. Repeat this process by wrapping the paper around the tines. Each time, wrap the tine one above or one below the existing loop.
  2. As you do this, the loops will be further and further away from each other.
  3. When necessary, shuffle the paper so the layers are stack.
  4. Continue in this fashion until the length is twice the size of the leaf you want to make.
quilling leaf quilling leaves
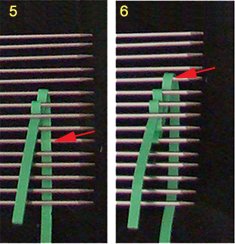
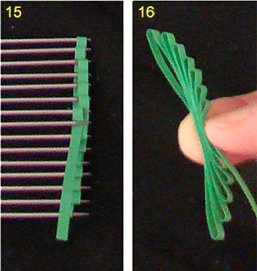
  1. This is how the paper looks.
  2. quilling leaves quilling leaves

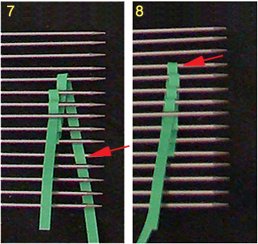
  3. When you are done, turn over the comb. Place a dab of glue on the paper near the center (tine 8).
  4. Fold the tail-end of the paper over the glue and press down for a few seconds to glue the papers together. Cut off extra paper.
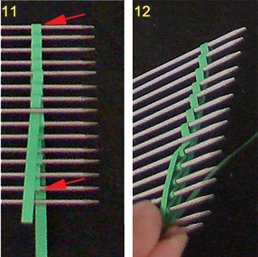
  5. Carefully slide the stack of loops off the tines of the comb.
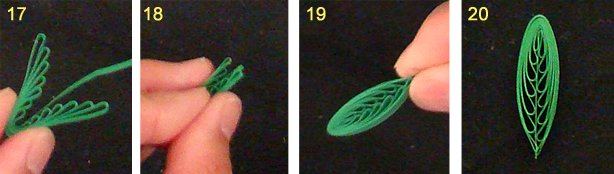
  6. Pinch the stack of paper together at the center. Be careful not to let the loops escape.
  7.  
    quilling leaf

  8. Fold the stack in half with the loops pointing inwards towards one another. The extra flap of paper serves as the mid-vein of the leave.
  9. Bring the two ends together. Cut off excess paper. Add a dab of glue and glue the ends together.
  10. Pinch and hold for a few seconds so the glue sets and you’re done.

Quilling Combing Leaf Variations:

  • left: leaf as demonstrated above.
  • center: leaf as demonstrated above except the shape is not pinched together in step 18. This allows the leaf to be round and the internal loops are more visible. The center mid-vein was cut off and the paper glued down inside the circle.
  • right: leaf made as above except in step 17, the shaped is folded so the loops face outwards. In order for the shape to maintain its shape, you need to wrap paper around the entire structure. Here, the wrap-around paper is blue
 

quilling combing leaf

  •  
     

    Please Help

    Please help by reporting broken links so that we can fix them. One easy message from you can save us hours and hours of clicking. Thanks!

  •  

    More Origami Diagrams and Instructions…

  • These free origami instructions are made available to you by the paper folding community at large. If you have a diagram you would like to share, or if your diagram is listed here and you wish to have it removed, please Contact Us. Diagrams are intended for personal use. Copyright of the models lie with the origami creators and designers. Please contact the designer and/or creator directly for non-private usage of a model and/or artwork.