Origami Symbols, Lines, and Arrows
This page defines some of the origami symbols, lines, and arrows used in origami books and diagrams. Many origami creators use creative ways to describe how a piece of paper should be folded. The list here is generally accepted by most origami artists. See this article for more details.

Lines
A solid black line is used to define the edges of a sheet of paper.
A gray line indicates a crease line: this is the place where the paper has been folded and unfolded, leaving a crease.
A dashed line indicates the location of a valley fold.
A dash-dot-dot line indicates the location of a mountain fold. Sometimes one dot is used instead of two giving it a dash-dot-dash-dot pattern.
A dotted line is often used to indicate an action that occurs behind the layers of paper. The dotted line is what you would see if you had see-through (x-ray) vision.
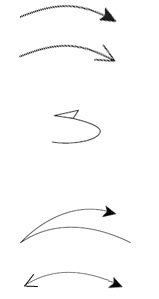
Origami Symbols: Arrows
An arrow with a filled (black) arrow-head is used to show directionality in a valley fold.
Some origami artists use an “open” arrow-head (letter V instead of a triangle). This type of arrow can be used with a valley fold or a mountain fold.
An arrow with half an arrow-head which is hollow (it is white or not filled) is used to show directionality in mountain folds.
A zig-zag arrow or a double headed arrow indicate “fold and unfold”. The zig-zag arrow is more clear but the double headed arrow is more space efficient.
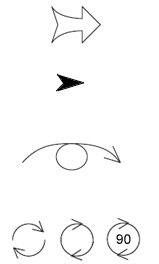
A rotund arrow indicates an action such as “push in” or “pull out” or “inflate”.
A filled arrow head (without the stem) is often used to indicate “push in”.
A loop-the-loop arrow indicates “turn the model over”. Flip the model so the top side becomes the bottom side.
These symbols indicate “rotate”. Sometimes there is a number or a fraction in the center. The “90” means “rotate 90 degrees clockwise”. The same move can be described with “1/4” which means “quarter turn clockwise”.
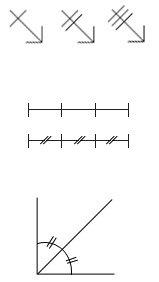
More Symbols
An arrow with a short, intersecting line indicates “repeat here”. The number of intersecting lines indicate how many times to repeat. Shown is repeat once, twice, and 3 times.
Segmented lines indicate “fold into equal sections”. As shown, it would mean to fold the paper into 3 sections of same size.
Similarly, angles can be divided into equal sections. Here, the corner of the paper should be folded in half to bisect the angle.


