Origami Business Card Orb
This origami orb was created by Jeannine Mosely and has wow’ed people for many years. Despite its curved edges and unique look, this model can be made if you have a circle template or a compass (the kind that comes with a geometry set, not the navigational kind). You can find information on the orbs here.
This origami project requires 6 business cards; you should already know how to make the business card cuboctahedron; and you should have a healthy dose of patience & persistence.
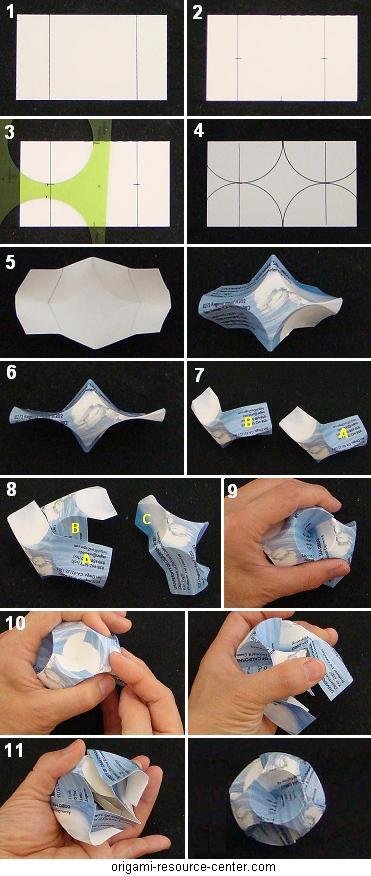
- Take two business cards and stack them perpendicular to one another (as shown here). Use a pencil or a pen to draw the lines as show.
- Within the penciled square, identify and mark the center points. There should be 4 points of reference: top point, right point, bottom point, and left point.
- You will need to score half-circle shapes. For scoring, you can use a folding bone, a tip of a knife, or a pen which has no more ink. For the circular shape, you can use a circle template or a compass.
For a 3.5″ x 2″ business card, score circles that are 2″ in diameter. Position the template (or compass) so the circle will intersect with two adjacent points-of-reference. In this example, it is the top-point and the left-point.
- Repeat on the other sectors to give 4 half-circles that are just touching each other (also called kissing circles).
- Fold along the scored lines. In this example, the white side is the inside of the orb and the blue side will be the outside (visible side) of the orb.
- In order for the orb to stay together, make a big effort to press the creases firmly so the business card is cinched tight as shown.
- Take two folded cards and assemble them so that section A of one card overlays onto section B of second card as shown.
- Take a 3rd folded card and place section C over section A and at the same time under section B.
- The three cards together should form a circular dimple.
- Rotate the model slightly and continue to add cards one at a time. Remember to overlay one section on top while tucking the other section under.
- Step 11 shows how the orb will look like when 5 cards are assembled. The last piece is the most difficult one to put in place.
If you creased the business cards well then the orb will maintain its shape. If you did not crease very well, then the orb will expand outwards (explode). You can compress it back to a more tight configuration and hold it in place for a few seconds to let the creases set. If necessary, you may wrap elastic bands around the orb overnight so that the creases can set.
—> go back to origami business card page
—> see other types of origami
—> find other free origami instructions
—> go to Site Map
-
Easy Origami Books
- Easy Origami: over 30 simple projects by John Montroll
- Origami Fun Kit for Beginners by John Montroll
- My First Origami Kit by Joel Stern
- Easy Origami: A Step-by-Step Guide for Kids by C Alexander & M Meinking
- Fun With Easy Origami (Dover Origami Papercraft)
- Origami: A Step-by-Step Introduction to the Art of Paper Folding by T Cook & S Henry
- Easy Origami For Kids Book Traditional Japanese Folding Papers Overs 20 Projects by J Wish
- Easy Origami for Kids: Over 40 Simple Origami Projects by O Brooks
- Click to see Easy Origami Books
-
Please Help
Please help by reporting broken links so that we can fix them. One easy message from you can save us hours and hours of clicking. Thanks! -
More Origami Diagrams and Instructions…
-
 Animals
 Birds
Birds Boxes
Boxes Butterflies
 Dinosaurs
 Holiday
 Dollar Bill
 Easy Origami
 Fish & Sea Life
 Flowers
 Hearts
 Insects
 Modular
 Paper Airplane
 Paper Cranes
 Polyhedra
 Reptile
 Star Wars
 Stars
Stars Vehicles
-
These free origami instructions are made available to you by the paper folding community at large. If you have a diagram you would like to share, or if your diagram is listed here and you wish to have it removed, please Contact Us. Diagrams are intended for personal use. Copyright of the models lie with the origami creators and designers. Please contact the designer and/or creator directly for non-private usage of a model and/or artwork.
-