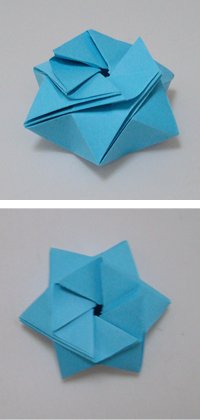
StarPuff Box
Ilan Garibi

This StarPuff Box was created by Ilan Garibi. It is an example of a crease-and-collapse design. If you have never made an origami via crease and collapse, then this is a good day for you to try!
An interesting feature of this model is that it starts with a hexagon instead of a square sheet if paper. Instructions to make a hexagon from a rectangle or from a square are provided; or you can print one out from here. The creasing of the hexagon paper is straightforward but the collapsing part may be tricky to some. Watch Garibi’s video to get help on the collapse part.
The model can be divided into 3 parts:
1. make a 8 x 8 grid of triangles.
2. make crease A all around the hexagon,
3. make crease B all around the hexagon, and
4. collapse into the StarPuff Box.
Make an 8 x 8 Grid of Triangles

1. Fold the hexagon into 8 equal divisions.
2. Rotate 1/6th turn and fold into 8 divisions again.
3. Rotate 1/6th turn and fold into 8 divisions one last time.

4a. Turn the model over and locate the central 6-pointed star (called a Star of David)
We will make two crease lines that extend from the corner of the Star of David.
Make Crease A

5. Rotate the model so it is balanced on one of the corners of the hexagon.
5b. Fold in half but press only at the edges outside of the Star of David.
6. Unfold. Rotate 1/6th turn, repeat two more times.
Make Crease B

7. Fold up the bottom corner of the paper so it meets with the spot that is one-triangle-above-the-center of the paper (join red dots).
7b. Press outward from the tip of the Star of David towards the edge of the paper.
8. Unfold, rotate, and repeat 5 more times.
Collapse

9. Collapse by pinching the model at 1, 2, 3, and 4 making mountain-valley-mountain-valley folds.
10. While holding the layers of paper together, continue to fold the next set of mountain-valley-mountain-valley folds.
The layers of paper will lay one-on-top-of-the other
and spiral down flat like a lid.

11. Lock the top layers my making a mountain fold and then tucking the paper into the pocket that is just underneath.
If necessary, insert a narrow tool (a skewer or chopstick) into the top opening and pop-out any dents.
12. Top view of model.
13. Bottom view of model.


– get StarPuff Box instructions in pdf form.
– get StarPuff Box instructions in video form
– more origami boxes
– more self-closing boxes & envelopes
– free origami instructions
– Home Page
-
Books with Origami Boxes
- Origami Boxes by Tomoko Fuse (see book review)
- Origami Boxes and More! by F Temko (book review)
- Unfolding Mathematics with Origami Boxes (book review)
- Fun With Folded Fabric Boxes by C Mills & A Tubis
- Fabulous Origami Boxes by Tomoko Fuse
- Quick & Easy Origami Boxes by Tomoko Fuse
Please Help
Please help by reporting broken links so that we can fix them. One easy message from you can save us hours and hours of clicking. Thanks!
-
More Origami Diagrams and Instructions…
-
These free origami instructions are made available to you by the paper folding community at large. If you have a diagram you would like to share, or if your diagram is listed here and you wish to have it removed, please Contact Us. Diagrams are intended for personal use. Copyright of the models lie with the origami creators and designers. Please contact the designer and/or creator directly for non-private usage of a model and/or artwork.


