Origami Sink Fold

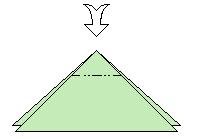
The origami sink fold is designated with a broad arrow and a mountain-fold line (dash-dot-dot). The arrow indicates a “push in” action while the line shows where the fold will occur.
How to do the Sink Fold:

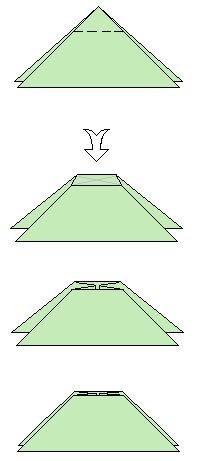
1) Fold at the indicated line back and forth (mountain and valley folds). Do this a few times to loosen the paper. Note that all 4 creases will be mountain folds when the sink is complete but for now, a back and forth motion is good.
2) Ease open the paper a little (in this example, a waterbomb base) and push the top of the paper down.
3) Continue to push down until the tip of the paper is sunken in between the layers of the paper.
4) Complete the sink fold by compressing the layers together.
-
Books with Easy Origami
- Easy Origami: over 30 simple projects by John Montroll
- Origami Fun Kit for Beginners by John Montroll
- My First Origami Kit by Joel Stern
- Easy Origami: A Step-by-Step Guide for Kids by C Alexander & M Meinking
- Fun With Easy Origami (Dover Origami Papercraft)
- Origami: A Step-by-Step Introduction to the Art of Paper Folding by T Cook & S Henry
- Easy Origami For Kids Book Traditional Japanese Folding Papers Overs 20 Projects by J Wish
- Easy Origami for Kids: Over 40 Simple Origami Projects by O Brooks
Please Help
Please help by reporting broken links so that we can fix them. One easy message from you can save us hours and hours of clicking. Thanks!
-
More Origami Diagrams and Instructions…
-
These free origami instructions are made available to you by the paper folding community at large. If you have a diagram you would like to share, or if your diagram is listed here and you wish to have it removed, please Contact Us. Diagrams are intended for personal use. Copyright of the models lie with the origami creators and designers. Please contact the designer and/or creator directly for non-private usage of a model and/or artwork.


