Origami Rabbit Face
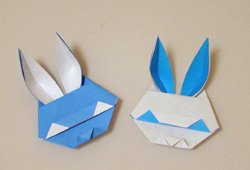
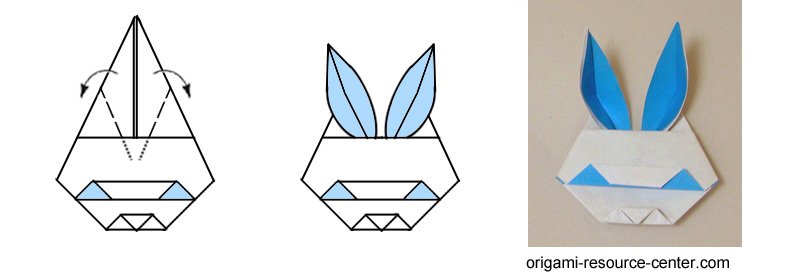
This Origami Rabbit Face works best when you use origami paper because it is different color on the back and front of the paper. The ability to change the colors of the ears is sweet!
Rabbit Face Instructions
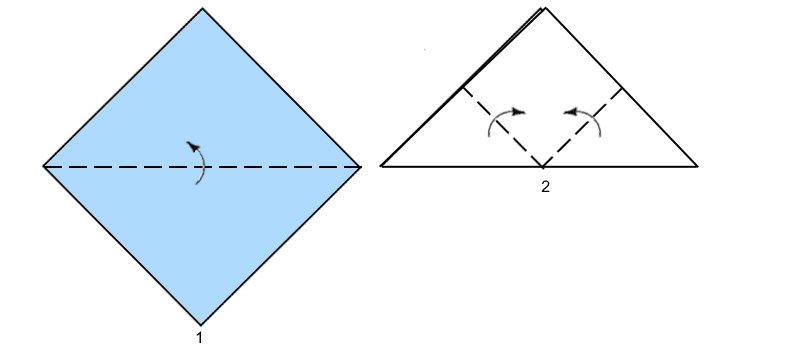
- Start with a sheet of origami paper with the color-side facing up. This will make the bunny mostly white with colored eyes and ears. Position the paper so it is “diamond” position (balanced on one of its corners). Fold the paper in half (bottom to top).
- Fold the left and right corners up to the top corner.
- Turn the paper around (image is enlarged a bit).
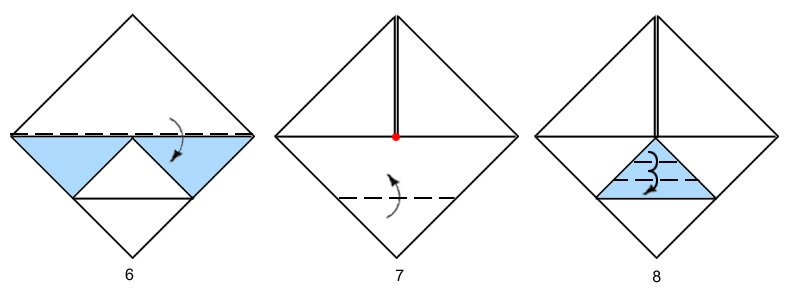
- Fold down the top-layer of paper.
- Fold this layer of paper back up but only half way.
- Fold the second layer of paper down.
- Fold this layer of paper back up half way.
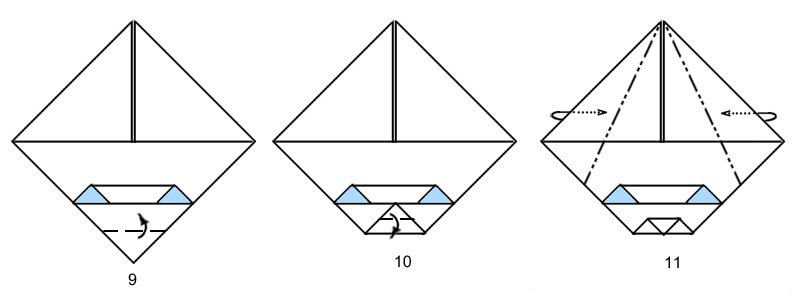
- Fold the paper down in thirds so that only two small triangles of colored paper is visible. These will be the eyes.
- Fold up the very bottom corner of the model. Fold up to the bottom of the eyes.
- Fold the corner back down to give an impression of a nose.
- Mountain fold (fold behind) the top-left and top-right sections of the model to make the ears more narrow.
- Finger through the layers of paper at the ears. Peel open the ears so the colored-side is visible. Press down to establish the crease.
- Done!

– get photo-instructions
– make another rabbit face
– more Easter Origami models
– free origami instructions
– Home Page
– Site Map
-
Books with Easy Origami
- Easy Origami: over 30 simple projects by John Montroll
- Origami Fun Kit for Beginners by John Montroll
- My First Origami Kit by Joel Stern
- Easy Origami: A Step-by-Step Guide for Kids by C Alexander & M Meinking
- Fun With Easy Origami (Dover Origami Papercraft)
- Origami: A Step-by-Step Introduction to the Art of Paper Folding by T Cook & S Henry
- Easy Origami For Kids Book Traditional Japanese Folding Papers Overs 20 Projects by J Wish
- Easy Origami for Kids: Over 40 Simple Origami Projects by O Brooks
Please Help
Please help by reporting broken links so that we can fix them. One easy message from you can save us hours and hours of clicking. Thanks!
-
More Origami Diagrams and Instructions…
-
These free origami instructions are made available to you by the paper folding community at large. If you have a diagram you would like to share, or if your diagram is listed here and you wish to have it removed, please Contact Us. Diagrams are intended for personal use. Copyright of the models lie with the origami creators and designers. Please contact the designer and/or creator directly for non-private usage of a model and/or artwork.


