Loopy Heart

valentine origamiLearn to make a Loopy Heart using four strips of paper. This is a weaving project great for Valentine’s Day and other expressions of love. It is not a hard project but it does take a bit of patience. Expect to try it 2 or 3 times before you can remember it by heart. The Loopy Heart is made in 3 steps:
      1. Prepare paper,
      2. Weave, and
      3. Loop
Sounds easy enough…

Loopy Heart Instructions

valentine origami

Prepare:
Cut four strips of paper of size 1/2″ x 11″. The easiest way to do this is to cut a 1/2″ strip off the side of a 8.5″ x 11″ paper. You can also buy pre-cut papers here


valentine origami


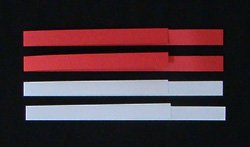
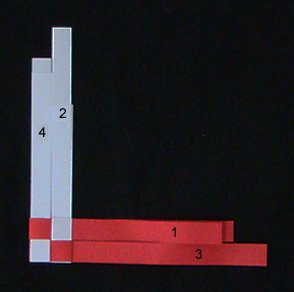
Fold the strips in half with an offset: this means to fold it so one side is 1.5 to 2 inches longer than the other side.


valentine origami

Weave:
Start by making the central square:

Place one strip of paper on the table so the folded edge is pointing to the right and the loose ends are pointing towards the left. It does not matter whether the shorter end is on top or below.


valentine origami

Weave a second strip of paper onto the first: the first strip should be completely inside the second strip. In this example, the white strip is on the outside (like slices of bread) and both red strips are inside (like the cheese and ham).


valentine origami

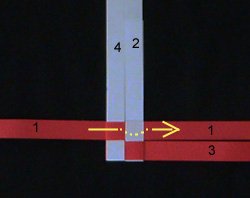
Weave a third strip of paper onto the second strip: third strip should go outside of the second strip.


valentine origami valentine origami
Weave the last strip of paper: it goes outside of the third strip AND it tucks inside of the first strip. The strips of paper should interlock. This is a classic basket weave which forms a central woven square. Tighten the central square by sliding the strips of paper closer to one another.


valentine origami valentine origami


Starting at the bottom left, fold both strip#2 up. Fold one strip#1 towards the right.


valentine origami valentine origami
Fold one strip#4 down. Fold both strip#3 towards the left and tuck it under the layer of paper from strip#2. Both strip#3 needs to be weaved through.


valentine origami


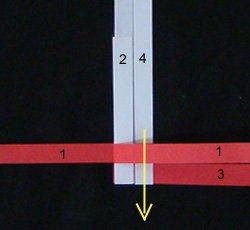
An easy way to remember this sequence of folds is to start at the bottom left and fold: 2, 1, 1, 2.

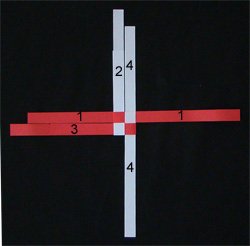
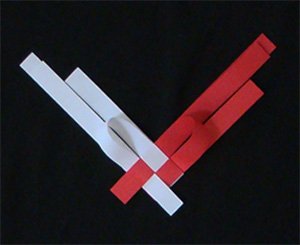
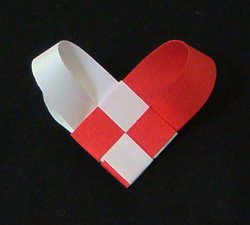
This is how it should look like when done.


valentine origami valentine origami


Work on the back side of the heart: turn over the paper so the part that was facing you is now facing the table. Again, start at bottom left, fold the one remaining strip#4 up.
Fold the one remaining strip#1 to the right AND tuck it under the paper from strip#2.


valentine origami

This is how it should look like. Rotate the paper slightly so it looks like the letter V. There are 8 strips of paper pointing upwards. Take note which are the four longest strips. These will be used for making the loops.

valentine origami

Loop:
Take one of the longest strips of paper and weave it through the adjacent “panel” (or square). It does not matter whether the longest strip is behind or in front. Do this for right and left sides of the heart. Adjust the weaved strips so the loops are the same size on both sides.
valentine origami

valentine origami

There is a little bit of paper extending past the shape of the heart. You have two choices:

Easy Method: Cut the overhanging paper and glue the ends of the strips down. Gluing is necessary so the loops cannot be accidentally pulled out.

Not Easy Method (shown on right, above): Turn the heart over so the loops are now behind. Fold and weave the overhanging bits of paper by tucking it under the existing layers of paper. If the overhanging bits of paper are long, you may need to trim it so you keep the checkerboard pattern. If the overhanging bits of paper are short, it will require a bit of work to fold and tuck the bits of paper.

valentine origami


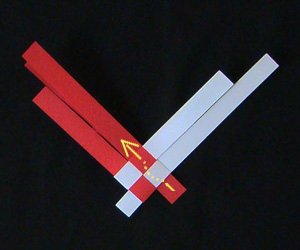
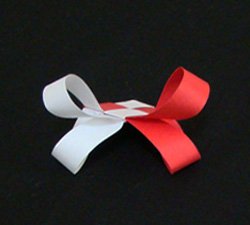
Once that is done, repeat the looping process on the back side of the heart:
– find the longest strip of paper,
– weave it down the adjacent panel,
– do this on left & right sides of the heart
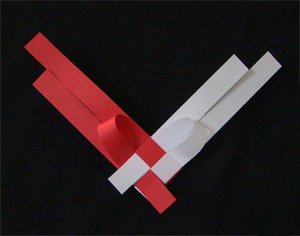
– cut & glue the overhanging bits of paper or, fold & tuck them under the existing layers of paper.

Cut off the four strips of paper which were not used in the looping process. Done!

  •  
     

    Please Help

    Please help by reporting broken links so that we can fix them. One easy message from you can save us hours and hours of clicking. Thanks!

  •  

    More Origami Diagrams and Instructions…

  • These free origami instructions are made available to you by the paper folding community at large. If you have a diagram you would like to share, or if your diagram is listed here and you wish to have it removed, please Contact Us. Diagrams are intended for personal use. Copyright of the models lie with the origami creators and designers. Please contact the designer and/or creator directly for non-private usage of a model and/or artwork.