Origami Crimp Fold

The crimp fold is shown with two fold lines that are relatively close together, and a pair of back-to-back zig-zag lines. The fold lines can be parallel to one another or they may be at an angle to one another (see below). The zig-zag lines show an alternative view of the paper: a view from the raw-edge of the sheet.
Some people use a single zig-zag line with an arrowhead; however, this is discouraged because it does not distinguish between the crimp fold and the pleat fold.

To Make a Crimp Fold:
- Unfold the model as much as you can without completely disrupting previous folds.
- Make one of the folds: in this example, make the mountain fold at the left side of the paper. The right side of the paper will swing back and lie behind.
- Make the second fold: valley fold the back layer thereby swinging the paper to the right again. Effectively, you have made a pleat. The dotted line is an X-ray line showing what happens behind the layers of paper.
- Lastly, mountain fold along the existing crease to reform the fold undone in step “a”

Note: the positioning of the valley and mountain folds will dramatically change the end-result.
Compare the difference between the green and blue sheets of paper. In the blue paper, the mountain fold is on the right so, the left side will lie in between the right layers.
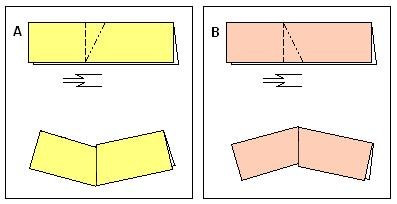
Crimp folds do not need to have parallel fold lines. In the above examples, the creases are at an angle to one another and intersect at the edge of the paper. This causes the model to curve. Other combinations exist.
In case A: at the crimp site, the top left section of the paper will lie in between the layers of the right side.
In case B: the bottom left of the paper (raw edge) will lie in between the layers of the right side of the paper. Here, the top of the model is barely recessed at all.


