
- more St Patrick’s Day crafts
- see other kid friendly crafts
- St Patrick’s Day origami
- go to Site Map
- Like Us on Facebook
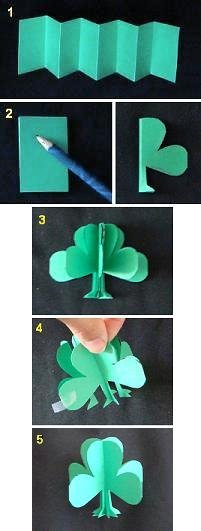
Notes:
The clover will stand up better if you cut the stem so that it has a wide, flared base.
The folded paper can be quite thick so caution is advised when cutting.
The final clover is only about 2″ high. Larger strip of paper may be easier to work with – for example, some teachers may have access to paper that is 4.5″ x 24″. Though construction paper is even thicker than photocopy (office) paper.
Whatever size paper you choose, you need to have 8 folded panels in order to have a 4 sided 3D-clover. When tracing out the clover be sure that the center of the clover is facing the folded edge of the paper. See image below (the left panel):
Please Help | Please help by reporting broken links so that we can fix them. One easy message from you can save us hours and hours of clicking. Thanks! |


These free origami instructions are made available to you by the paper folding community at large. If you have a diagram you would like to share, or if your diagram is listed here and you wish to have it removed, please Contact Us. Diagrams are intended for personal use. Copyright of the models lie with the origami creators and designers. Please contact the designer and/or creator directly for non-private usage of a model and/or artwork.