Origami Insignia Ring


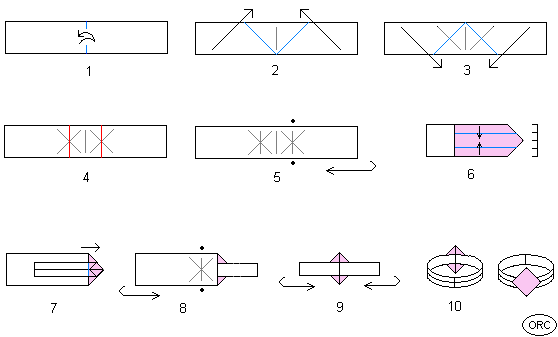
- Start with a strip of duo-color paper that is about 1″ x 4″. Valley fold in half crosswise. Unfold.
- Fold the bottom right edge towards the midline, unfold. Repeat with left side.
- Fold the top right edge towards the midline, unfold. Repeat with left side.
- Mountain fold crosswise at the place where the creases intersect.
- Bring the right side towards the left. Allow the paper to fold along the pre-creases. The paper should rise towards you at the • The fold is similar to a waterbomb base.
- Fold the bottom and top edges towards the middle. This forms an arm which will become the band of the ring.
- Valley fold the entire arm back to the right.
- Repeat with the left side. (Hint: to facilitate the next step, make one arm slightly larger than the other.)
- Bring the left and right arms together and tuck one into the other.
- Adjust the ring to size and press the insignia region to re-enforce the folds. Done.
- click here to see Dollar bill Insignia Ring
-
Dollar Bill Origami Books
- The Buck Book by Anne A Johnson (see book review here)
- The Guide to Hawaiian Style Money Folds by Jodi Fukumoto (see book review here)
- The Guide to American Money Folds by Jodi Fukumoto (see book review here)
- Dollar Bill Origami by John Montroll (see book review here)
- Dollar Bill Animals in Origami by John Montroll
- Origami with Dollar Bills: Another Way to Impress People with Your Money! by Duy Nguyen
- Money Folding (Origami Favorites Series) by Florence Temko
- buy these books in: USA
, Canada, UK
, Germany
, France
-
Please Help
Please help by reporting broken links so that we can fix them. One easy message from you can save us hours and hours of clicking. Thanks! -
More Origami Diagrams and Instructions…
-
These free origami instructions are made available to you by the paper folding community at large. If you have a diagram you would like to share, or if your diagram is listed here and you wish to have it removed, please Contact Us. Diagrams are intended for personal use. Copyright of the models lie with the origami creators and designers. Please contact the designer and/or creator directly for non-private usage of a model and/or artwork.
-


